Hoe kan ik bijlagen weergeven in BIRT-rapporten voor IBM Maximo Application Suite (MAS 9)

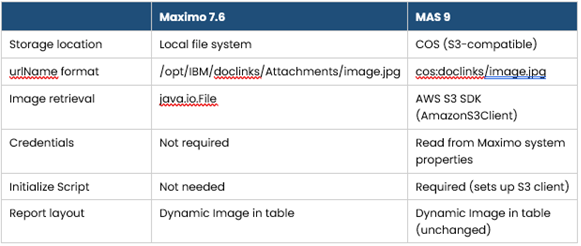
In onze vorige bloghebben we besproken hoe u afbeeldingen kunt weergeven die door veldtechnici zijn bijgevoegd, rechtstreeks in BIRT-rapporten in IBM Maximo 7.6. Die aanpak werkte door afbeeldingsbestanden rechtstreeks uit het bestandssysteem van de server te lezen met behulp van een lokaal bestandspad dat is opgeslagen in de URL-naam veld van de docinfo bezwaar maken.
Met de overstap naar IBM Maximo Application Suite (MAS 9) werkt die methode niet meer. MAX 9 is een cloud-native platform, en bijlagen worden niet langer opgeslagen op een lokaal bestandssysteem, maar in Opslag van objecten in de cloud (COS), dat compatibel is met S3. De URL-naam Het veld bevat nu een COS-referentie (bijvoorbeeld cos:doclinks/your-file.jpg) in plaats van een lokaal pad, dus de oude File () -benadering faalt volledig.
Deze blog beschrijft de bijgewerkte aanpak om die beelden van S3/COS op te halen en weer te geven in uw BIRT-rapporten op MAS 9.
In Maximo 7.6 wees de URLName-waarde rechtstreeks naar een bestand op schijf, bijvoorbeeld:
/opt/IBM/SMP/maximo/doclinks/Attachments/image.jpg
Het script las dat bestand gewoon met behulp van Java.io.File en gaf de bytes door aan het dynamische BIRT beeldelement — eenvoudig voor implementatie op locatie.
In MAX 9, hetzelfde veld bevat nu een COS-URI zoals:
cos:doclinks/image.jpg
Er is geen lokaal bestand om te lezen. De afbeelding bevindt zich in een S3-bucket en u moet zich authenticeren met AWS-inloggegevens en het object downloaden tijdens de uitvoering van het rapport. De opmaak van het BIRT-rapport zelf (dynamische afbeelding in een tabelcel) blijft exact hetzelfde. Alleen de scripts hoeven te worden gewijzigd.
De oplossing omvat twee scriptgebieden in de BIRT report designer:
De stappen voor de indeling van het rapport (het maken van een dataset van docinfo, het koppelen aan een tabel, het invoegen van een Dynamic Image-element) blijven hetzelfde als beschreven in de originele blog. Als u deze stappen nog niet hebt voltooid, raadpleeg dan de stappen 1-3 van de originele gids eerst.
Maak, net als voorheen, een dataset die de URL-naam van de docinfo object, gefilterd op basis van uw criteria (bijv. specifieke inspectievraag of documenttype). De URL-naam kolom is wat de scripts zullen gebruiken om de afbeelding in S3 te lokaliseren.
Stel uw tabel samen, bind deze aan de dataset en plaats een afbeeldingselement in de relevante cel. Stel het brontype van de afbeelding in op „Dynamisch beeld” — dit is ongewijzigd ten opzichte van Maximo 7.6.
In het rapport Initialiseren scriptsectie, voeg het volgende toe. Dit wordt één keer uitgevoerd bij het opstarten van het rapport, leest de COS-inloggegevens uit de systeemeigenschappen van Maximo en creëert een gedeelde S3-client:

importPackage(Packages.com.ibm.tivoli.maximo.report.script);
importPackage(Packages.com.amazonaws.auth);
importPackage(Packages.com.amazonaws.services.s3);
importPackage(Packages.com.amazonaws.services.s3.model);
importPackage(Packages.psdi.server);

var accessKey = MXServer.getMXServer().getProperty("mxe.cosaccesskey");
var secretKey = MXServer.getMXServer().getProperty("mxe.cossecretkey");
var bucketName = MXServer.getMXServer().getProperty("mxe.cossysbucket");

// Set up AWS credentials and S3 client
var credentials = new BasicAWSCredentials(accessKey, secretKey);
var s3Client = new AmazonS3Client(credentials);

mxReportScriptContext = MXReportScriptContext.initialize(reportContext);
mxReportScriptContext.setDefaultLogLevel("DEBUG");
mxReportScriptContext.setDefaultLogFile("servicereport.log");
scriptLogger = mxReportScriptContext.getReportScriptLogger();
Opmerking: De inloggegevens (mxe.cosaccesskey, mxe.cossecretkey, mxe.cossysbucket) worden rechtstreeks uit de systeemeigenschappen van Maximo gelezen, zodat het niet nodig is gevoelige waarden in het rapport hard te coderen.
In het Dynamic Image-element OnCreate script, voeg het volgende toe. Dit wordt voor elke rij geactiveerd, parseert de COS-URI, downloadt de afbeelding, verwerkt de formaatconversie, past JPEG-compressie toe en stelt de weergaveafmetingen in:
importPackage(Packages.javax.imageio);
importPackage(Packages.javax.imageio.stream);
importPackage(Packages.java.io);
importPackage(Packages.java.lang);
importPackage(Packages.java.awt.image);
importPackage(Packages.java.awt);
importPackage(Packages.java.net);
importPackage(Packages.com.amazonaws.auth);
importPackage(Packages.com.amazonaws.services.s3);
importPackage(Packages.com.amazonaws.services.s3.model);

if (row["urlName"] != null) {
    var fullUrl = String(row["urlName"]);
    var prefix = "cos:doclinks/";
    var cleanFileName = fullUrl;
    var fileName = "";
    var fileExtension = "";

    if (fullUrl != null) {
        if (fullUrl.startsWith(prefix)) {
            cleanFileName = fullUrl.substring(prefix.length);
        }
        var lastSlashIndex = cleanFileName.lastIndexOf("/");
        fileName = (lastSlashIndex >= 0)
            ? cleanFileName.substring(lastSlashIndex + 1) : cleanFileName;
        var lastDotIndex = fileName.lastIndexOf(".");
        if (lastDotIndex >= 0 && lastDotIndex < fileName.length - 1) {
            fileExtension = String(fileName.substring(lastDotIndex + 1).toLowerCase());
        }
    }

    var s3Object = null; var inputStream = null;
    var img = null; var bas = null;
    var ios = null; var writer = null;

    try {
        s3Object = s3Client.getObject(new GetObjectRequest(bucketName, cleanFileName));
        inputStream = s3Object.getObjectContent();
        img = ImageIO.read(inputStream);

        if (img == null) {
            throw new Error("Failed to read image from S3: " + fileName);
        }

        // Convert to RGB if needed
        if (img.getType() !== BufferedImage.TYPE_INT_RGB) {
            var rgbImage = new BufferedImage(
                img.getWidth(), img.getHeight(), BufferedImage.TYPE_INT_RGB);
            var g = rgbImage.createGraphics();
            g.drawImage(img, 0, 0, Color.WHITE, null);
            g.dispose();
            img = rgbImage;
        }

        bas = new ByteArrayOutputStream();
        var format = (["jpeg","jpg","png","bmp"].indexOf(fileExtension) >= 0)
            ? fileExtension : "jpeg";

        if (format === "jpeg" || format === "jpg") {
            var writers = ImageIO.getImageWritersByFormatName("jpeg");
            if (!writers.hasNext()) throw new Error("No JPEG writer available");
            writer = writers.next();
            ios = ImageIO.createImageOutputStream(bas);
            writer.setOutput(ios);
            var param = writer.getDefaultWriteParam();
            if (param.canWriteCompressed()) {
                param.setCompressionMode(
                    javax.imageio.ImageWriteParam.MODE_EXPLICIT);
                param.setCompressionQuality(0.3);
            }
            writer.write(null,
                new javax.imageio.IIOImage(img, null, null), param);
        } else {
            if (!ImageIO.write(img, format, bas)) {
                throw new Error("Failed to write image: " + format);
            }
        }

        this.data = bas.toByteArray();

        var picWidth = img.getWidth();
        if (picWidth > 300) {
            var aspectRatio = img.getHeight() / picWidth;
            this.width = '300px';
            this.height = Math.round(300 * aspectRatio) + 'px';
        } else {
            this.width = null; this.height = null;
        }

    } catch (e) {
        throw new Error("Error processing '" + fileName + "': " + e.message);
    } finally {
        if (writer != null) writer.dispose();
        if (ios != null) ios.close();
        if (bas != null) bas.close();
        if (inputStream != null) inputStream.close();
        if (s3Object != null) s3Object.close();
    }
}
Bekijk een voorvertoning van het rapport in BIRT Designer om te controleren of de afbeeldingen correct worden weergegeven. Na verificatie importeert u het rapport in MAS en test u het door een PDF te genereren op basis van een werkorder of inspectie met fotobijlagen.
De migratie van Maximo 7.6 naar MAX 9 introduceert een fundamentele verandering in de manier waarop bijlagen worden opgeslagen en geopend. Door over te schakelen van een lokale benadering op basis van bestanden naar ophalen op basis van S3/COS, moeten de scripts die dynamische beelden in BIRT-rapporten aandrijven, dienovereenkomstig worden bijgewerkt.
Met het Initialize Script dat S3-authenticatie verwerkt en het OnCreate Script het downloaden van objecten en de beeldverwerking beheert, kunt u in MAS 9 net zo effectief uitgebreide, beeldverbeterde rapporten blijven leveren, net zo effectief als in 7.6.
Discover everything you need to know to modernize your asset management strategy.
Inside, you’ll learn:

ActiveG, BPD Zenith, EAM Swiss, InterPro Solutions, Lexco, Peacock Engineering, Projetech, Sharptree, and ZNAPZ have united under one brand: Naviam.
You’ll be redirected to the most relevant page at Naviam.io in a few seconds — or you can
go now.
.jpg)
.avif)